Telemetry Exports🔗
Verity supports both external alert exports as well as sending time series data to external data stores. The two methods include:
- Prometheus Scraping
- AlertManager
Prometheus Scraping🔗
The customer adds this job to their own Prometheus config to pull selected time-series from the Verity Prometheus instance.
# Customer's prometheus.yml
scrape_configs:
  - job_name: 'federation'
    honor_labels: true
    metrics_path: '/federate'
    scrape_interval: 30s
    scrape_timeout: 25s
    params:
      'match[]':
        - '{job="telegraf"}'                        # all telegraf-collected switch metrics
        - '{__name__=~"ALERTS|ALERTS_FOR_STATE"}'   # alert-related metrics
        - '{__name__="ifHCInOctets"}'               # cherry-pick a specific metric
    static_configs:
      - targets:
          - '<vendor-prometheus-host>:9090'
    # if Verity Prometheus is behind TLS or basic auth:
    # scheme: https
    # basic_auth:
    #   username: "federation_user"
    #   password: "s3cret"
    # tls_config:
    #   ca_file: "/etc/prometheus/certs/cert-ca.pem"
    #   insecure_skip_verify: false
Key points🔗
honor_labels: true— preserves originaljob,instance, etc. labels from Verity instead of overwriting them with the federation job's labels.match[]— scope to only the series needed. Pulling everything ({__name__=~".+"}) is expensive and defeats the purpose of federation.scrape_interval— 30s is a reasonable default; should not exceed Verity's own interval (currently 15s for telegraf, 5s for sflow-rt).- Firewall — port
9090on the Verity Prometheus host must be reachable from the customer's Prometheus. A reverse proxy or VPN tunnel may be needed if the instance is not externally exposed.
Alert Manager🔗
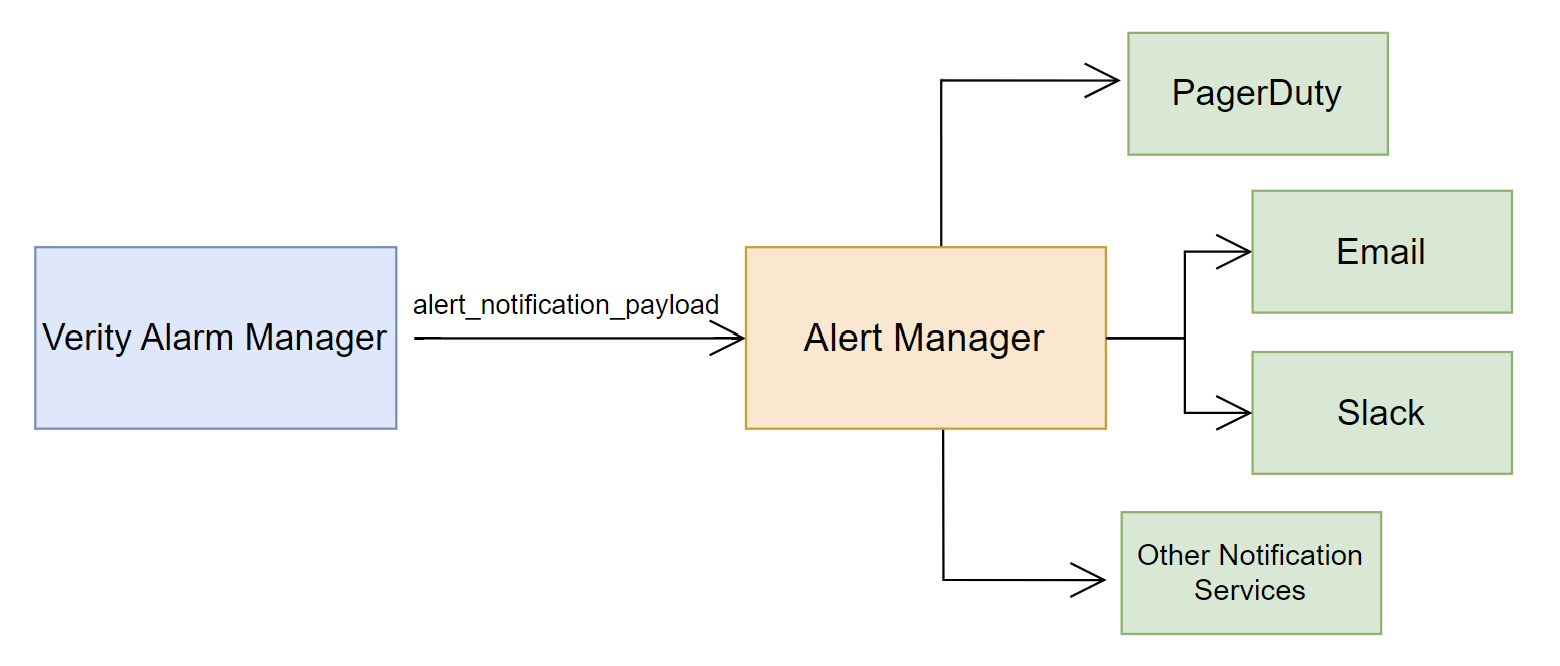
Alert Manager is a configurable tool that allows you to forward Verity alarm data to third-party messaging services such as email, PagerDuty, Microsoft Teams, and others.
The following diagram represents the relationship between Alarm Manager, Alert Manager, and an arbitrary collection of connected messaging services.
Configuring Alert Manager Exports🔗
The process for editing AlertManager is:
- Edit
/be_monitoring/alertmanager/user-config.yml(email/receiver settings) - Run
/be_monitoring/utilities/render_alertmanager_config.shto apply
Example: Email notifications via SMTP
#@data/values
---
smtp:
  smarthost: "smtp.company.com:587"
  from_address: "alerts@company.com"
  auth_username: "alerts@company.com"
  auth_password: "s3cretP@ss"
  require_tls: true

notification_email:
  to: "noc-team@company.com"
  send_resolved: true
Example: Adding a Slack integration
notification_receiver_integrations:
  webhook_configs:
    - url: "https://my-ticketing-system.com/api/alert"
      send_resolved: true
Example: Adding a fully custom receiver + route
additional_receivers:
  - name: critical-pagerduty
    pagerduty_configs:
      - service_key: "abc123"
        send_resolved: true

additional_routes:
  - matchers:
      - severity="critical"
    receiver: critical-pagerduty
    continue: false
Applying changes
run /be_monitoring/utilities/render_alertmanager_config.sh
This:
- Merges vendor config + user values + overlay via
ytt - Writes the final alertmanager.yml
- Reloads Alertmanager via
POST /-/reload - Persists user configs to
/be_install/archive/for upgrade survival
Scenario 1 — AlertManager webhook receiver behind TLS🔗
Edit user-config.yml (the ytt data values file). Two approaches depending on required control level.
Option A — notification_receiver_integrations (simplest)🔗
Leverages built-in overlay logic. Auto-creates a receiver and a matching route for job="alarm_manager_notification" alerts, generating a receiver named notification-webhook-0 with continue: true.
# user-config.yml
notification_receiver_integrations:
  webhook_configs:
    - url: "https://customer-noc.example.com/alerts/webhook"
      send_resolved: true
      http_config:
        tls_config:
          ca_file: "/etc/alertmanager/certs/ca.pem"
          cert_file: "/etc/alertmanager/certs/client.pem"
          key_file: "/etc/alertmanager/certs/client-key.pem"
          insecure_skip_verify: false  # set true for self-signed certs (not recommended in prod)
Option B — additional_receivers + additional_routes (full control)🔗
Use when custom matchers are needed or alerts beyond alarm_manager_notification must be routed.
# user-config.yml
additional_receivers:
  - name: customer-tls-webhook
    webhook_configs:
      - url: "https://customer-noc.example.com/alerts/webhook"
        send_resolved: true
        http_config:
          tls_config:
            ca_file: "/etc/alertmanager/certs/ca.pem"
            cert_file: "/etc/alertmanager/certs/client.pem"
            key_file: "/etc/alertmanager/certs/client-key.pem"
            insecure_skip_verify: false
          # basic_auth:          # optional if webhook requires it
          #   username: "vendor"
          #   password: "s3cret"

additional_routes:
  - matchers:
      - severity=~"critical|warning"
    receiver: customer-tls-webhook
    continue: true
Mount TLS certs into the AlertManager container🔗
Add a volume bind in the Docker Compose override so cert files are accessible at the paths referenced above.
# docker-compose override
alertmanager:
  volumes:
    - /path/to/customer/certs:/etc/alertmanager/certs:ro
Re-render and reload after editing🔗
- Render the final
alertmanager.ymlvia ytt:./utilities/render_alertmanager_config.sh - Reload AlertManager (or restart the container):
curl -X POST http://localhost:9093/-/reload
Enabling TLS Encryption🔗
Reference docs: