Security Lockdown Overview🔗
Overview🔗
This document provides instructions to prepare virtual machines and devices within the Verity platform for operations in highly secure environments. Standards are defined by the Joint Interoperability Command (JITC). The process involves securing all the components to ensure they are trusted on the network, prevent any possible tampering within the components and that all communications between components use highly secured encryption technologies. All physical devices and the SDLC application are processed independently in the first steps and should remain disconnected from the system when the last step, the vNETC orchestration platform is processed and locked down.
Before You Begin🔗
- The security lockdown process for Verity components requires all equipment used in the process are located on the same network subnet as the file server containing any files needed for the lockdown process. For switch and ONT devices, that server must reside on the PC/host that is physically connected to the device.
- The user must provide SSL Certificates that are installed during the lock down process. Certificates are contained in a file format called PEM (defined in RFC 1422), which can contain either just the public certificate (e.g., CA certificate files in /etc./SSL/certs) or a full certificate chain with the private key, public key, and root certificates.
- Certificate files may have different names depending upon the entity generating them. Also, in the case of many switches and ONT devices, the files usually have serialized names so they can be tracked. For the purposes of this document the following names and descriptions are used:
1. crt.pem – file used by devices and the SDLC to validate the orchestration platform certificate
1. client.pem – file used by devices and the SDLC to identify themselves
1. Client-cert.pem – file used by the SDLC/ACS to validate clients. Sometimes referred to as the certificate-chain file
1. server.pem - used by the vNETC and ACS to identify themselves to the managed devices/SDLC. This is the “web server key and certificate” file
1. Multiple DoD root certificate chain files - multiple files loaded via drag/drop to "Root Certificate Chains"
1. External Authentication Client Certificate - loaded via drag/drop (use for client connection to the RADIUS server
1. Certificate Revocation List - single CRL file loaded via drag/drop
- The following SW loads are required to support Security Lockdown
- Core – 6.0.0.161
- Firmware Package 1.2.1.11
- The following SW loads are required to support Security Lockdown
Device Requirements
The devices (switches and ONTs) MUST BE IN A CLEAN FACTORY RESET CONDITION before starting the process or connecting to any system. If they are connected to a system before starting the process, once they contain a valid load, the user should factory reset the device appropriately.
Certificate Names
Certificate names are used throughout this document; however, as mentioned, the certificate names you work with may not be the same as the examples provided.
SSH🔗
To configure any device for lockdown, SSH must be used to access the device command line interface. The setup process assumes the user has requisite knowledge of SSH.
What File Transfer Protocol and Software Do I Need for Certificates?🔗
Installing certificates can be done with HTTP or TFTP and examples are provided for both HTTP and TFTP. It is the user’s responsibility to choose and manage their file transfer server application.
Command Line Writing Convention🔗
Users are prompted to input commands throughout the procedure. The commands are shown as bold text. The following example prompts the user to use the command line interface and apply the commands admin and security.
Main/ admin/security
The result is the command line directory is changed to Security Base Menu. Text in a grey background represents the content displayed on the command line window.
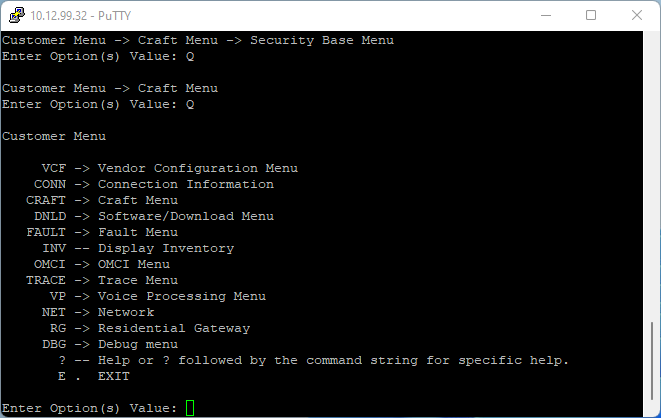
Customer Menu

ACS Security Menu Commands

keys -\> SSH keys get, del & show Menu
cert -\> SSL certificate get, del & show Menu
host -\> Host ip/name add, del & show Menu
? -- Help or ? followed by the command string for specific help.
Q \<- One Level Back
E . Exit

Main/ administration/ Security Base Menu/
Device Command Line QuickStart🔗
This section of the documentation provides an overview of the device command line software interface, which consists of menus and commands.
In the example below, the command to the left of each -> symbol navigates to the menu that is to the right of each -> symbol.
Customer Menu

VCF -\> Vendor Configuration Menu
CONN -\> Connection Information
CRAFT -\> Craft Menu
DNLD -\> Software/Download Menu
Menu symbols may have different forms such as:
-> >> -- .
In the following example, the command CRAFT is associated with the Craft Menu. To navigate to the Craft Menu, type CRAFT and press Enter.
Customer Menu

VCF -\> Vendor Configuration Menu
CONN -\> Connection Information
CRAFT -\> Craft Menu
DNLD -\> Software/Download Menu
FAULT -\> Fault Menu
INV -- Display Inventory
OMCI -\> OMCI Menu
TRACE -\> Trace Menu
VP -\> Voice Processing Menu
NET -\> Network
RG -\> Residential Gateway
DBG -\> Debug menu

? -- Help or ? followed by the command string for specific help.

E . EXIT

Enter Option(s) Value: CRAFT
Basic Navigation
To navigate to a previous menu, you use the Q command.
Some windows prompt you with \< > icons. These icons convey that user defined inputs are to be submitted. User defined inputs are called parameters. The following code prompts you to type a URL of your choosing.
<url\>
In the following example the get-cert command requires between 1 to 3 parameters. The parameters include a certificate type, URL, and a file name. The certificate type is prefaced by the -t or –type command. 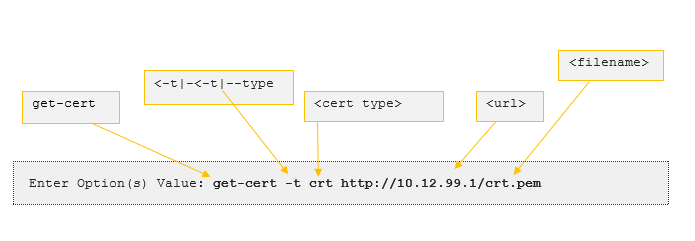
Enter Option(s) Value: get-cert

Command requires from 1 to 3 parameters

Usage:

get-cert \<-t\|--type\> \<cert type\> \<url\>

Usage:

\-t, --type \<crt\|client\> - Certificate type (required)

\<url\> - In the form "http://10.12.99.1/\<...\>/\<filename\>
get-cert \<-t\|--type\> \<cert type\> \<url\>
Security lockdown for ONT Device🔗
The security lockdown process for an ONT device is summarized in four steps:
-
Log into the device using SSH
-
Install certificates
-
Lock down the device
-
Repeat this for all ONT devices that are connecting to the locked down system.
Connecting to the Device🔗
Hardware Setup🔗
Connect an ethernet cable from a PC to ethernet port #1 on the ONT.
Using SSH to Access the Device Interface🔗
Network Configuration🔗
The ONT has a backdoor IP address of 10.12.99.32. The PC must be in the same subnet, such as 10.12.99.30. The IP address of the PC's Ethernet Network Interface Card (NIC) must be set to 10.12.99.30.
Authentication🔗
SSH must be used to access and configure the device. It is assumed that the user has the requisite knowledge to use SSH.
- SSH: 10.12.99.32
- Login: tech
- Password: \<enter default tech password>
- Upon successful authentication the interface window will be displayed, and the Craft Menu is available.
About SSL Certificates🔗
ONT Requires Two SSL Certificates🔗
The ONT requires two certificates - crt.pem and client.pem - to be present. The crt.pem is used to validate the server certificate of the ACS. The client.pem is the certificate sent by the ONT to authenticate the ONT when it is talking to the ACS and vNETC.
Certificates Have Unique Names🔗
The certificates you install on your system will have unique names. For this document, they are referred to as crt.pem and client.pem.
Installing the ONT CRT Certificate🔗
To begin, navigate to the SSL certificate Base Menu
Customer Menu/CRAFT/SEC
Customer Menu -\> Craft Menu -\> Security Base Menu -\> SSL certificate Base Menu
The SSL certificate Base Menu provides an option to add, delete, list, and display SSL certificates content.
- Select cert.
- Select get-cert -t \<cert type> \<url>.
- The window that appears prompts you for the certificate type, the URL and file name.
- Submit the command. The result of your entry is formatted like the following examples depending on the transfer protocol you use:
HTTP
get-cert -t crt <http://10.12.99.30/crt.pem>
TFTP
get-cert -t crt tftp://10.12.99.30/crt.pem
Verify SSL Certificate Download🔗
- Use the show-cert -t crt command to verify that the SSL Certificate process completed properly.
- The certificate contents are presented.
Installing the ONT Client Certificate🔗
- Navigate to the SSL certificate Base Menu Customer Menu/CRAFT/SEC
- The SSL certificate Base Menu provides an option to add, delete, list, and display SSL certificates content.
- Select cert.
- Select get-cert -t \<cert type> \<url>.
- The window prompts you for the certificate type, the URL and file name.
Enter Option(s) Value: get-cert

Command requires from 1 to 3 parameters

Usage:

get-cert \<-t\|--type\> \<cert type\> \<url\>

Usage:

\-t, --type \<crt\|client\> - Certificate type (required)

\<url\> - In the form "http://10.12.99.32/\<...\>/\<filename\>
Submit the command. The result of your entry is formatted like the following examples depending on the transfer protocol you use.
HTTP
get-cert -t client <http://10.12.99.30/client.pem>
TFTP
get-cert -t client tftp://10.12.99.30/client.pem
Verify SSL Certificate Download🔗
- Use the show-cert -t client command to verify that the SSL Certificate process completed properly.
- The certificate contents are presented.
Lock-Down Mode🔗
Setting the device into Lock-Down Mode is the last step in the configuration.
Locking Down🔗
- Navigate to the Security Base Menu.
- Select lock (Type q and press Enter to go back one level).
Reboot🔗
This is the last step in preparation to place the ONT in lockdown mode. 1. Navigate to the Craft Menu (type q and press Enter to go back one level). 1. Type r and press Enter.
Verify Lockdown🔗
- Use SSH to authenticate into the device.
- If you are unable to authenticate the lockdown is successful.
Security lockdown for Switch Device🔗
The lockdown process for a Switch device can be summarized in four steps: 1. Log into the device using SSH 1. Install certificates 1. Lock down device 1. Repeat this section for all switching devices that are connecting to the locked down system.
NOTE: Before You Begin🔗
If the switch is going to be installed as a “Top of Rack” (TOR) and the uplink connection does not support using LLDP for automatic TOR and Uplink detection, please refer to the switch documentation to manually set up the TOR before proceeding.
Securing the Device🔗
Use SSH to Access the Device Interface🔗
Network Configuration🔗
The switch has a backdoor IP address of 10.12.99.32. The PC must be in the same subnet, such as 10.12.99.30. The IP address of the PC's Ethernet Network Interface Card (NIC) must be set to 10.12.99.30.
Authentication🔗
SSH must be used to access and configure the device. It is assumed that the user has the requisite knowledge to use SSH.
- SSH: 10.12.99.32
- Login: tech
- Password: \<enter default tech password>
- Upon successful authentication the interface window is displayed with the prompt Main#.
About SSL Certificates🔗
Switch Requires Two SSL Certificates🔗
The switch requires two certificates - crt.pem and client.pem - to be present. The crt.pem is used to validate the server certificate of the vNETC. The client.pem is the certificate sent by the Switch to authenticate the Switch when it is talking to the vNETC.
What File Transfer Protocol Do I Need for Certificates?🔗
Installing certificates can be done with either HTTP or TFTP.
Installing the CRT Certificate🔗
- Navigate to the SSL certificate Base Menu admin/security/cert.
- The SSL certificate Base Menu provides an option to add, delete, list, and display SSL certificates content.
- Select cert.
- get-cert -t crt \<url/filename>
- The window that appears prompts you for the certificate type, the URL, and the file name.
- Submit the command.
- The result of your entry is formatted like the following examples depending on the transfer protocol you use:
HTTP
get-cert -t crt <http://10.12.99.30/crt.pem>
TFTP
get-cert -t crt tftp://10.12.99.30/crt.pem
Verify SSL Certificate Download🔗
- Use the show-cert --type crt command to verify that the SSL Certificate process completed properly.
- The certificate contents are presented.
Installing the Client Certificate🔗
- Navigate to the SSL certificate Base Menu Main/admin/security/cert.
- The SSL certificate Base Menu provides an option to add, delete, list, and display SSL certificates content.
- Select cert.
- Select get-cert -t client \<tftp://10.12.99.32/2S846000025.pem>.
- The window that appears prompts you for the certificate type, the URL, and the file name.
Enter Option(s) Value: get-cert Command requires from 1 to 3 parameters Usage: get-cert \<-t\|--type\> \<cert type\> \<url\> Usage: \-t, --type \<crt\|client\> - Certificate type (required) \<url\> - In the form "http://10.12.99.32/\<...\>/\<filename\> - Submit the command. The result of your entry is formatted like the following examples depending on the transfer protocol you use.
HTTP
get-cert -t client <http://10.12.99.30/client.pem>
get-cert -t client tftp://10.12.99.30/client.pem
Verify SSL Certificate Download🔗
- Use the show-cert --type client command to verify that the SSL Certificate process completed properly.
- The certificate contents are presented.
Lock-Down Mode🔗
Enter q to go back a level in the menu to set the device into Lock-Down mode.
Locking Down🔗
- Navigate to Main/admin/security
- Select lock.
Reboot🔗
This is the last step in preparation to place the Switch in lockdown mode. Enter q to go back a level
Navigate to the Main Menu, type reboot and press Enter.
Verify Lockdown🔗
Use SSH to attempt to access the device. If you are unable to login using the same credentials the lockdown is successful.
Security lockdown for SDLC/ACS Virtual Machine Applications🔗
The configuration process can be summarized in four steps.
-
Log into the SDLC application using SSH. The user’s PC and file server containing certificates (may be the same machine) must have access to the management VLAN that the SDLC is connected to.
-
Install certificates for the SDLC and ACS application in the SDLC
-
Lock down the SDLC application
-
After the vNETC is locked down and the SDLC is subsequently connected, the user will create the ACS application and it inherits the certificates and lockdown status from the SDLC. There is no explicit process for the ACS during this step of the procedure.
Securing the SDLC Application🔗
Use SSH to Access the Device Interface🔗
SSH must be used to access and configure the device. It is assumed that the user has the requisite knowledge to use SSH.
Login: tech
Password: \<enter tech default password>
Upon successful authentication the interface window is displayed with the prompt Main#.
Install SSL Certificates🔗
SDLC Requires Two SSL Certificates - crt.pem and client.pem - to be present.🔗
Installing the CRT Certificate🔗
To begin, navigate to the SSL certificate Base Menu.
Main/admin/security/cert
Main/ administration/ Security Base Menu/ SSL certificate Base Menu\#
The SSL certificate Base Menu provides an option to add, delete, list, and display SSL certificates content.
Select cert.
Select get-cert -I br4094 -t crt \<url/filename>.
get-cert -- Get certificate file from specified URL
del-cert -- Delete certificate from persistent memory
list-certs -- List certificates from persistent memory
show-cert -- Show certificate from persistent memory
? -- Help or ? followed by the command string for specific help.
Q \<- One Level Back
E . Exit
The window that appears prompts you for the certificate type, the URL, and the file name.
Enter Option(s) Value: get-cert

Command requires from 1 to 3 parameters

Usage:

get-cert \<-t\|--type\> \<cert type\> \<url\>

Usage:

\-t, --type \<crt\|client\> - Certificate type (required)

\<url\> - In the form "http://10.12.99.1/\<...\>/\<filename\>
🔗
Submit the command. The result of your entry is formatted like the following examples depending on the transfer protocol you use.
HTTP
get-cert -i br4094 -t crt <http://10.12.99.30/crt.pem>
TFTP
get-cert -i br4094 -t crt tftp://10.12.99.30/crt.pem
Verify SSL Certificate Download🔗
- Use the show-cert -t crt command to verify that the SSL Certificate process completed properly.
- The certificate contents are presented.
Installing the Client Certificate🔗
To begin, navigate to the SSL certificate Base Menu.
Main/admin/security/cert
Main/ administration/ Security Base Menu/ SSL certificate Base Menu\#
The SSL certificate Base Menu provides an option to add, delete, list, and display SSL certificates content.
Select cert.
Select get-cert -i br4094 -t client \<url/filename>.
get-cert -- Get certificate file from specified URL
del-cert -- Delete certificate from persistent memory
list-certs -- List certificates from persistent memory
show-cert -- Show certificate from persistent memory
? -- Help or ? followed by the command string for specific help.
Q \<- One Level Back
E . Exit
The window that appears prompts you for the certificate type, the URL, and the file name.
Enter Option(s) Value: get-cert

Command requires from 1 to 3 parameters

Usage:

get-cert \<-t\> \<cert type\> \<url\>

Usage:

\-t, -type \<crt\|client\> - Certificate type (required)

\<url\> - In the form "http://10.12.99.1/\<...\>/\<filename\>
Submit the command. The result of your entry is formatted like the following examples depending on the transfer protocol you use.
HTTP
get-cert -i br4094 -t client <http://10.12.99.30/client.pem>
TFTP
get-cert -t client tftp://10.12.99.30/client.pem
Verify SSL Certificate Download🔗
- Use the show-cert -type client command to verify that the SSL Certificate process completed properly.
- The certificate contents are presented.
Securing the ACS Application🔗
Note, the ACS inherits the certificates from the SDLC when the ACS is created.
Install SSL Certificates🔗
The ACS requires four certificates: a server.pem and client-crt.pem for ONT communication, as well as a client.pem and crt.pem for vNETC communication.
Installing the CRT Certificate for ONT Communication🔗
- To begin, navigate to the ACS SSL certificate Base Menu.
- Enter q to return to Security Menu
acs/cert
Main/ administration/ Security Base Menu/ ACS Security Menu/ SSL certificate Base Menu\#
-
The SSL certificate Base Menu provides an option to add, delete, list, and display SSL certificates content.
-
Select get-cert -i br4094 -t crt \<url/filename>.
get-cert -- Get certificate file from specified URL
del-cert -- Delete certificate from persistent memory
list-certs -- List certificates from persistent memory
show-cert -- Show certificate from persistent memory
? -- Help or ? followed by the command string for specific help.
Q \<- One Level Back
E . Exit
The window that appears prompts you for the certificate type, the URL, and the file name.
Command requires from 1 to 3 parameters

Usage:

get-cert \<-t\> \<cert type\> \<url\>

Usage:

\-t, --type \<crt\|client\> - Certificate type (required)

\<url\> - In the form "http://10.12.99.1/\<...\>/\<filename\>
Submit the command. The result of your entry is formatted like the following example.
**get-cert -i br4094 -t client-crt http://10.101.1.4/download/ca-devices.pem**
Verify SSL Certificate Download🔗
- Use the show-cert -t client-crt command to verify that the SSL Certificate process completed properly.
- The certificate contents are presented.
Installing the Client Certificate for ONT Communication🔗
Main/ administration/ Security Base Menu/ ACS Security Menu/ SSL certificate Base Menu\#
- The SSL certificate Base Menu provides an option to add, delete, list, and display SSL certificates content.
- Select get-cert -t server \<url/filename>.
- The window that appears prompts you for the certificate type, the URL, and the file name.
Command requires from 1 to 3 parameters

Usage:

get-cert \<-t\> \<cert type\> \<url\>

Usage:

\-t, --type \<crt\|client\> - Certificate type (required)

\<url\> - In the form "http://10.12.99.1/\<...\>/\<filename\>
Submit the command. The result of your entry is formatted like the following example.
``` get-cert -i br4094 -t server http://10.101.1.4/download/server.pem
Verify SSL Certificate Download🔗
- Use the show-cert -t server command to verify that the SSL Certificate process completed properly.
- The certificate contents are presented.
Lock-Down Mode🔗
Setting the device into Lock-Down mode is the last step in the configuration:
- Navigate to Main/ administration/ Security Base Menu# or enter q twice to return to Main Security Menu
- Select lock.
Reboot🔗
This is the last step in preparation to place the SDLC in lockdown mode. After this step, the SDLC should be rebooted for the lockdown to be in effect.
Verify Lockdown🔗
Use SSH to authenticate into the SDLC. If you are unable to authenticate the lockdown is successful.
SDLC Power State
POWER DOWN THE SDLC application until the vNETC lockdown is completed.
Security Lockdown for the vNETC Orchestration Platform🔗
The next step in the process requires the vNETC virtual machine to be installed under VMware.
During the installation you install the following certificates: - Web Certificate - Radius Client Certificate - Certificate Authority Chains
Information
IJITC-conforming vNETCs provide FIPS-140-2 conforming encryption on all networking connections traversing virtual machine and hardware boundaries. All participating devices must provide mutual authentication.
There are other considerations to meet the FIPS-140-2 standard, including the use of the VMware ESXi hypervisor on specific certified hardware. This document assumes that the system is being configured according to the document: BEVN Installation for VMWare ESXi.
BEVN Installation for VMWare ESXi🔗
Read VMWare document up to and not including step 7. Instructions here are to be elaborated on and this is placeholder text.
Set Download Address to vNETC FQDN🔗
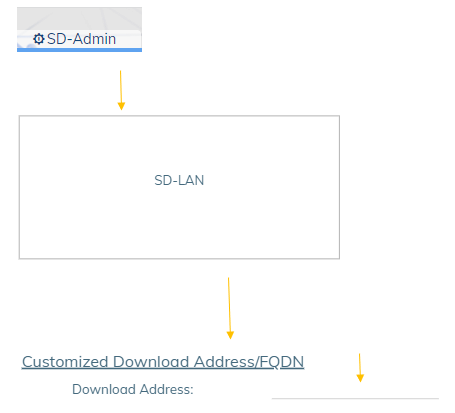
In secure lockdown, devices must use FQDN to access the vNETC for downloads. Using an IP address is not possible due to TLS certificate requirements.
Go to SD-LAN and set the Download Address to the vNETC FQDN. Set the vNETC FQDN to the form titled Download Address.
SD-admin / SD-LAN
Certificate Management🔗
vNETC Certificate files are installed from SD-ADMIN via the Certificate Management collection of certificate panels.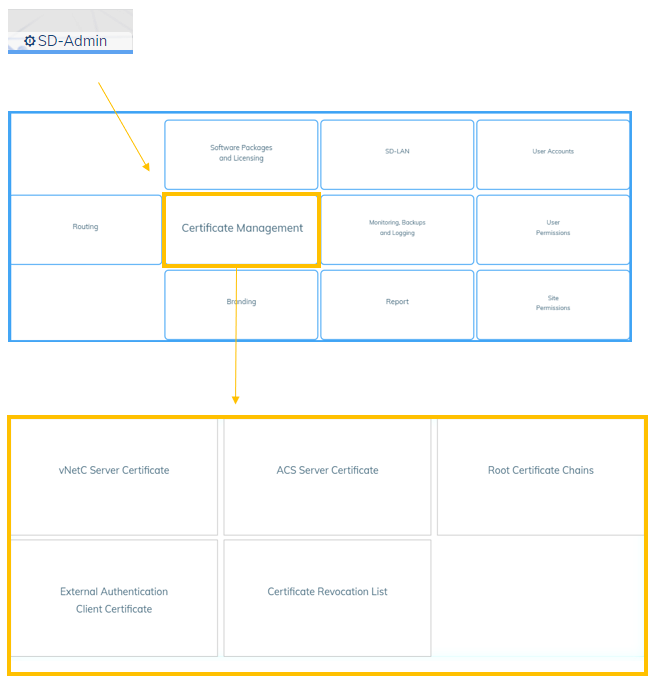
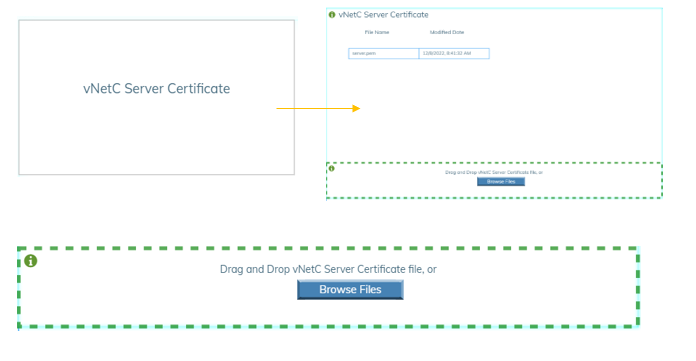
vNETC Web-Server Certificates🔗
The vNETC requires a web server certificate. This certificate provides TLS validation ensuring secure communication when web browsers and devices contact the vNETC. The certificate must fit one of two criteria.
- The certificate contains the private key, has FQDN set as the common-name, and a certificate authority chain.
- The certificate contains the private key, a certificate with a "wildcard" common-name, and a certificate authority chain. The "wildcard" would be of the form: *.dept.branch.mil
- The certificate is uploaded to the vNETC Server Certificate panel shown here.
Certificate Authority Chains🔗
The vNETC must be loaded with certificate authority chains composed of intermediate and root certificates. For systems in secure lockdown, all Root Certificate Chains are used to validate client certificates (such as CAC) and device client certificates. All such certificate chains should be uploaded to the Root Certificate Chains panel as shown here. Multiple files can be uploaded and are used when validating all TLS client connections (users or devices). 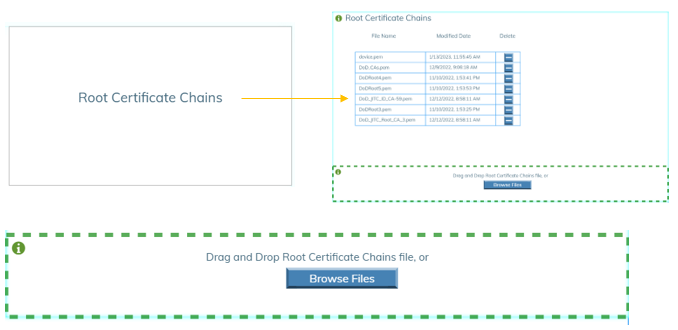
RADIUS Client Certificate🔗
The Radius client certificate authenticates the vNETC with the RADIUS authentication server(s). The RADIUS authentication server is configured under the User Accounts panel as shown in the following diagram.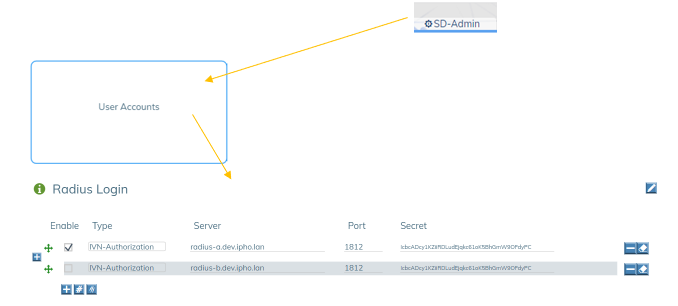
The vNETC must have a client certificate file containing the private key and a certificate signed by an authority recognized by the RADIUS server. The certificate is required for systems in secure lockdown, and until it is loaded, only the emergency admin user will have access to the system. For other systems, the certificate is used if provided.
The RADIUS client certificate is uploaded to the External Authentication Client Certificate panel (shown here). 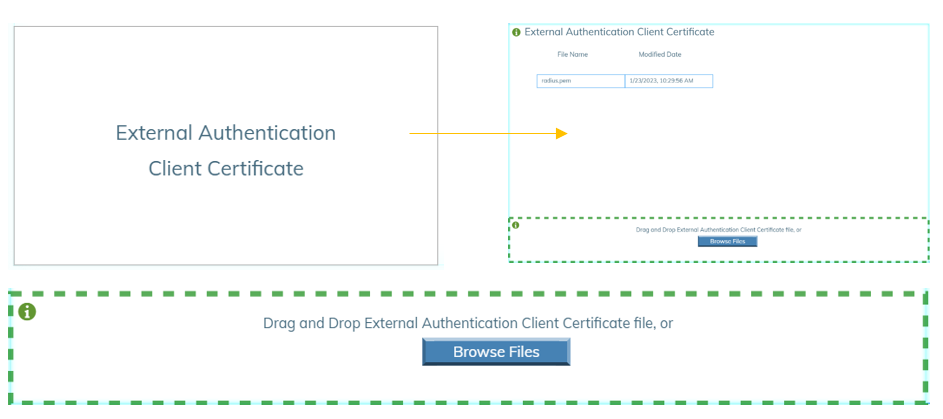
Revocation List🔗
The Certificate Revocation List contains a list of "X509 CRL" entries that revoke client certificates that are no longer valid for use by web browsers or devices. 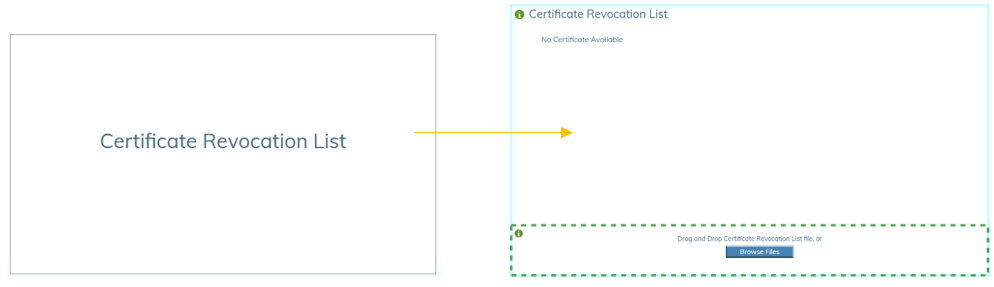
vNETC Secure Lockdown Mode🔗
Once the system is configured with the required certificates you perform the following actions: 1. Login as Root user with root password. 1. Run the following command: ns_vnc_setup --features jitc_mode=1. 1. When the vNETC becomes accessible, you are required to provide a PIN for CAC based authentication before being able to access the login page. Complete the PIN submission action. 1. If you are then able to access the login page and login in, the vNETC is secure and can be made accessible from the production network.
When in Lockdown Mode
- A client certificate from an approved authority is required.
- The emergency username is always "admin”, and its password is set during system installation.
- If no RADIUS servers are enabled, or none can be reached, only the emergency user will have access.
- If any RADIUS servers are accessible, the emergency user will not have access unless the RADIUS server gives authorization.
- All other users must be authorized via the RADIUS server(s).
- The three-login failure limit leads to a 15 min cooling-off period.